
Essential Guide to Ultrasonic Cleaning
|
With Covid restrictions slowly beginning to ease across parts of the country, we’re hopeful that it won’t be long until our gun ranges can reopen. In the meantime, we’re all still trying to make the most of our extra time at home, and we at Grycol have been doing our best to bring you some suggestions. If you haven’t already, now is a great time to give your guns a good spring cleaning and set yourself up for a great post-Covid season. This month we’re exploring ultrasonic sound waves as an alternative method of keeping your firearms squeaky clean. Ultrasonic cleaners have been around for decades, and have been used across a number of industries to clean jewelry, medical instruments, and mechanical equipment. In more recent times L&R Ultrasonics, a leading US manufacturer pioneered the use of Ultrasonic cleaners for cleaning firearms. |
 |
|
|
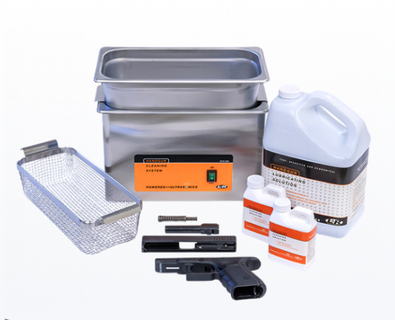
Ultrasonic vs Traditional Cleaning. Traditionally, cleaning your gun involves a lot of time and effort. Taking it apart and manually scrubbing each individual component with rods, brushes, and pads, as well as handling harsh chemicals and oily lubricants can be messy, tedious work. While some shooters find this process therapeutic, if you own more than one firearm it can turn into a pretty formidable task. Enter the ultrasonic cleaner. Not only does this nifty little gizmo do the hard work for you, it does it quicker and far more effectively. This method is especially good when it comes to those hard to reach places that can be fiddly to get clean. A manual wash can only do so much when it comes to removing carbon and grime from vital internal components. An ultrasonic cleaner will dislodge build up and debris from every nook and cranny, leaving your firearm sparkling clean. Depending on your budget, an ultrasonic cleaner can be a bit on the pricier side, so a lot of shooters opt to go in with a couple of mates if they want to get their hands on one. However, industrial-grade cleaning and lubricating will do wonders for extending the life of your firearm – so it’s well worth the investment. How Do They Work? The process involves submerging your firearm in a detergent or oil solution prepared in the tank. The device will then bombard it with high frequency sound waves and agitate the liquid to create millions of tiny cavitation bubbles. As the bubbles implode, they expel powerful jets of energy, shaking loose any dirt particles or residue that has collected inside your gun. It is a cleaning action unlike any other and will scrub your gun clean from the inside out without damaging the finish. But wait, there’s more! An ultrasonic cleaner can also be used to lubricate your firearm after cleaning. In the same way the ultrasonic sound waves cleanse every inch of your gun, they also drive the lubricating solution into every crack and crevice. This results in an even coating that will protect even hidden surfaces from rust. Getting Started When operating an ultrasonic cleaner, always follow the manufacturer’s instructions and ensure you only use products specifically designed for cleaning firearms. Check the label for the ratio of solution to water and pour into the unit’s tank. Next you want to field strip your firearm down to it’s main components and immerse it in the bath. Plug the machine in, pop on the lid, and switch it on. A general clean should only take about fifteen minutes, but if a deeper clean is necessary to remove heavy fouling, you may have to leave it in for up to thirty. When you’re happy with the result, remove the parts, rinse, and dry thoroughly – compressed air is good for this. After a deep clean, you’re going to want to lubricate. Empty the tank of cleaning fluid, and fill with ultrasonic lubrication solution so that all parts are submerged. Some units, like the HCS200 come with a lube tank that sits on top of the unit so there’s no need to empty and refill the main tank (just make sure the pan is in contact with the liquid below). Switch the machine back on for around fifteen minutes, then remove parts and allow to air dry. Once dry, we generally advise manually adding a touch more lubricant to your gun’s moving parts to help prevent wear. Things to Avoid Whilst ultrasonic sound waves work a treat for cleaning up gun metal, there are a few materials that will not withstand the high temperatures and intense agitation that takes place inside the tank. Experts recommend leaving out any parts made of anodized aluminum, soft polymer or rubber, so remember to remove the grips! Wood or ivory components should also be avoided as they can crack or warp in the ultrasonic bath.
Once the process is complete, simply reassemble your firearm and marvel at her shine. The only thing left to do is head out to the range and try her out! Regular ultrasonic cleaning will ensure you’re getting the most out of your gun. You’ll notice an improvement in accuracy right away, and she’ll be a lot more reliable for a lot longer. It’s for this reason, L&R Ultrasonic firearm cleaners are used by the Department of Defence and police armories Australia wide. If you would like to know more, you can browse our range of ultrasonic cleaners here. |
|
|
|
|
||